Saturday, 16 February 2019

The Curse of the CU - Technical update

The retop is complete on the shoe model and, beyond the normal map projection, only simple PBR materials have been applied so far.

David's shoe retopology - Complete

David's shoe - Arnold render

David's shoe - Arnold render


This model is a single, manifold mesh and I'm now wondering if that was the best approach. A little more work and time will tell.

Friday, 15 February 2019

The Curse of the CU

The film starts with a "set up" rather than a traditional, wide establishing shot. The upward pedestal of the camera scans over the protagonist while accentuating his descent in the lift car.

It looks to be a promising and affecting shot.

A possible downside is that every detail of the character is revealed in closeup, requiring detailed modelling and texturing of every element.

Take these shoes as an example...

David's shoe - Sculpt

David's shoe - Sculpt

David's shoe - Retopology

The textures will reveal that they are old and battered, the lack of laces a clue to the situation of their owner. All well and good but... they will be seen closeup so require that much more work.

Leica It or Not

I've taken a character proxy, rough 'n' ugly rigged it and thrown it at the environment to work out some shot timing, camera angles and transitions.


It ain't right but that's not a bad thing. Figuring out what's wrong is half the battle?

Re-framing in Premiere can help a little but some shots are revealed as being ineffectual. The high angle, long shot and track to the lift doors is a car crash at the moment. Other shots show promise but could need cut-away to emphasise impact.

There are some alternate shots and moves in this lot but more experimentation is required.

Saturday, 9 February 2019

Time for T (pose)


Taking this character to a full body t-pose raises a few issues.

It's not a particularly natural pose. In relation to a relaxed pose, the clavicles and scapula are raised, trapezius and deltoid muscles are pronounced, the latissimus dorsi are flared and the pectorals are elongated. How will all this translate when rigged?

The proportions need tweaking here. The navel is low and the leg bones need attention


Some adjustments have been made. A mouth sack has also been added. The closed, puckered mouth would have made the task of retopologising the head for animation very tricky. The more relaxed jaw should allow for effective use of edge loops around the mouth.

Wednesday, 16 January 2019

Light Fakery

One method I have explored for reducing the number of lights in a scene is the use of emissive materials.
Lift car interior
The lift car is contained within semi-opaque walls. Lighting from behind using, for example, four area lights and transmissive materials could lead to hugely increased render times.

This solution uses one point light and the walls have a subtle glow. While it may not be physically accurate, it does give a pleasing result.

Illusions - Angel Columns & The Missing Figures

I'd considered including optical illusion imagery within the scene to signify or emphasise the psychological leanings of the story. My first thought was to use simple framed images (and that is still a plan) but I came across this 3D illusion in my searches.

Angel Columns at the Phaeno Science Center
Angel Columns, David Barker (1989)
www.anopticalillusion.com/2013/09/angel-columns-at-the-phaeno-science-center/
Using negative space, Barker's piece presents a series of symmetrical, standing figures.

This led me to search for images that would suit my purpose, push the idea of authority and control. I took images of chained prisoners and developed them in a similar way, turning columns and placing them to fool the eye with negative space. These would form balusters as part of a screen in the Doctor's office.
Development of image to column
Having a set of four columns which would create two symmetrical characters, it was a small leap to juxtapose them in different combinations to produce four asymmetrical figures.

Angel columns recreation - Arnold render

Filling it out - Furniture and props

Many items of furniture and props populate the asylum corridor and Doctor's office. These help ground the scene in a time, style, mood and scale.

Modelling techniques varied according to the task at hand. 
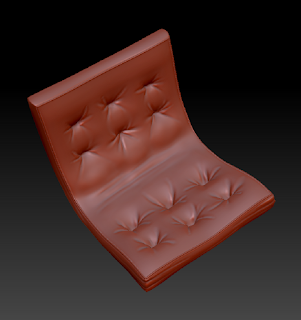
Studded cushion in ZBrush
This studded cushion was created through simple extrusion techniques before being subdivided and brought into ZBrush for sculpted detailing. This detail was projected onto the base mesh as a normal map and an orange tweed diffuse map would complete the look.
Doctor's office - Back-lit sign
This sign was created using simple box modelling and extrusion techniques. An emission map was employed to approximate the effect of a semi-opaque, back-lit sign. The diffuse map is combined with a subtle bump to represent dirt and the thickness of the painted text.
Image result for round screen tv
1950 Zenith round-screen television
www.ebay.com/itm/1950-Zenith-Tyler-12-round-screen-TV-/182543473460
Cell numbers - Antique screens
 These signs mark each cell door along the corridor. They are inspired by antique, 1950's television screens. The screen image has scan lines and a fuzzy glow created by a combination of diffuse and emission maps.
Doctor's office furniture and props

These items mark the beginning of office prop production. All office furniture is based on period or reproduction mid-century modern items.

Scale (both absolute and comparative) will be an important factor in maintaining credibility. Macro and micro detail in combination with believable shaders will assist in this with a variety of construction materials (plastic, wood, glass, metal, painted, bare, worn, eroded) displaying distinct characteristics.